

Table of Contents
- What You'll Need Before You Start Organizing
- Saddle Hunting Gear Checklist: The Complete Loadout
- Step 1: Distribute Weight Across Your Saddle Hunting Gear Setup
- Step 2: Build an Accessory Belt and Pouch System
- Step 3: Store Lineman's Rope, Tether, and Bridge Ropes
- Step 4: Mount Your Platform, Sticks, and Bow
- Step 5: Master Mobile Hunting Setup Organization at the Tree
- Step 6: Weatherproofing and Moisture Management
- Frequently Asked Questions
Last Updated: October 1, 2026
What You'll Need Before You Start Organizing
Good organization starts before you touch a single strap. You need a flat surface, a scale, and a plan.
- Your full loadout, spread out where you can see it
- A kitchen or luggage scale
- A notebook or phone for weights
- Storage totes with labels
- Any worn straps or cracked plastic to replace
Saddle Hunting Gear Checklist: The Complete Loadout
A complete setup covers climbing, safety, and comfort. Skip a category and you'll feel it at height.
Core Climbing and Safety Gear
- Saddle and lineman's belt
- Tether and bridge
- Climbing sticks or one-sticking setup
- Platform or ROS
- Harness and carabiners
- Rappel kit if you rappel down
Accessories That Earn Their Weight
- Accessory belt or pouch system
- Gear hanger and bow hook
- Rope caddy for bridge and tether storage
- Gear cinchers for aiders and loose items
- Scent control bag
Every item should justify its ounces. The Tree Stand Safety guidelines from the National Bowhunter Education Foundation cover the safety basics worth reviewing before every season.

Step 1: Distribute Weight Across Your Saddle Hunting Gear Setup
Weight distribution decides how far you can hike without gassing out, and, on a saddle, how long you can sit still once you're up there. Most guides stop at "heavy stuff close to your spine." That's the hike-in half of the problem. The other half is what happens after you're tethered in, and almost nobody writes about it.
The Two Loads You're Actually Carrying
Think of your setup as two separate loads that share one body:
- The transit load, everything on your back and belt during the walk in. This is governed by pack geometry.
- The hang load, everything clipped to your saddle, bridge, or a gear strap once you're at height. This is governed by where the weight pulls against your hips and tether.
Transit Load: Pack Geometry Rules
- Heaviest items (platform, sticks, water) ride against your spine, centered between your shoulder blades and your hip belt.
- Ropes and soft goods go in outer pockets so they don't push the hard items away from your back.
- Quick-access items, release, calls, rangefinder, sit on your belt or chest, never buried.
- Keep the total under roughly 20 percent of your body weight for sustained hiking; a 180-pound hunter tops out near 36 pounds before pace and recovery suffer noticeably.
A balanced 25-pound load carries easier than a lopsided 20-pound one. The imbalance, not the total, is what burns you out.
Hang Load: The Hip-vs-Tree Balance Nobody Talks About
Once you're in the tree, your saddle becomes the load-bearing structure. Two failure modes show up over and over:
- Hip-heavy loading. Everything hangs off one side of your saddle, platform caddy on the right, nothing on the left. You spend the sit counter-leaning, and your lower back pays for it by hour two.
- Bridge drag. A heavy pouch or rope caddy clipped forward of your bridge pulls the bridge off-center, which changes your angle of hang and quietly shortens your effective sit time.
A Simple Weigh-In Routine
- Weigh the empty pack and belt.
- Load the transit configuration and weigh again. Note the number.
- Move items to the hang configuration and weigh the saddle with everything clipped on.
- If the hang load is more than a few pounds, ask what can move to the tree strap instead.
Step 2: Build an Accessory Belt and Pouch System
Your accessory belt is your mobile command center. Build it so your most-used tools are reachable without looking.

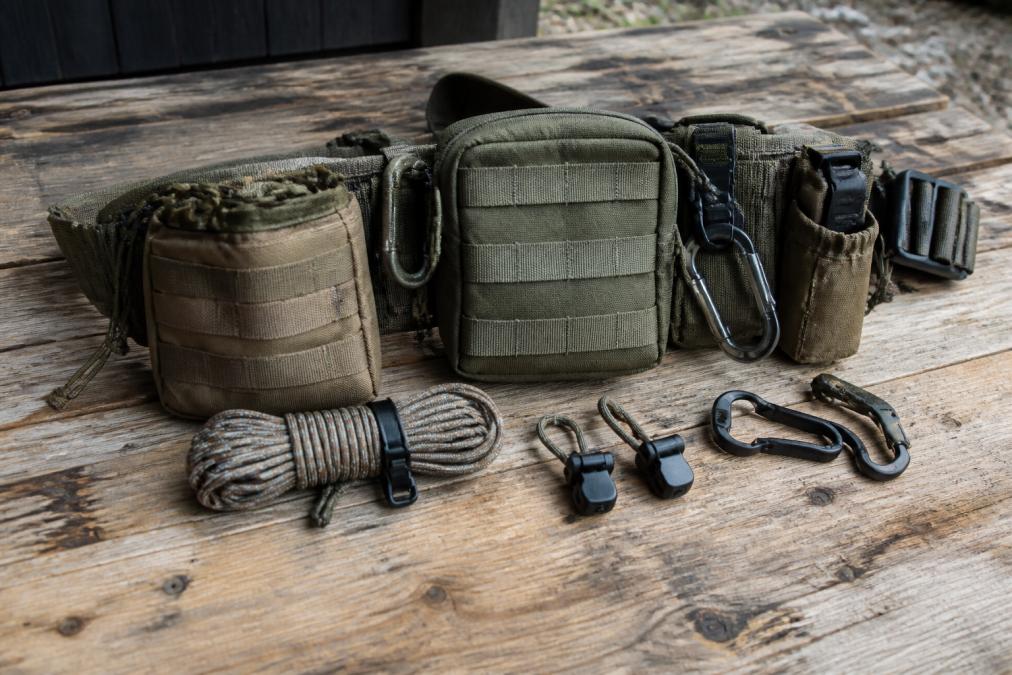
- Lineman's rope and tether on the back
- Platform caddy on one hip
- Bow hook and gear hanger on the other
- Small pouch for calls, release, and snacks
Step 3: Store Lineman's Rope, Tether, and Bridge Ropes
Ropes tangle. Tangled ropes cost you time and make noise.
Step 4: Mount Your Platform, Sticks, and Bow
Mounting gear to your pack and saddle is where organization pays off.
Finding the Best Bow Hanger for Saddle Hunting
The best bow hanger for saddle hunting keeps your bow within arm's reach without adding clutter. Look for one that mounts to your saddle or a gear strap and holds the bow securely.
Step 5: Master Mobile Hunting Setup Organization at the Tree
Mobile hunting setup organization means everything has a home before you climb.
| Step | Action | Time |
|---|---|---|
| 1 | Set platform caddy and hang pack | 1 min |
| 2 | Clip bow hook and gear hanger | 1 min |
| 3 | Secure ropes on caddies | 1 min |
| 4 | Check all carabiners and buckles | 1 min |
Step 6: Weatherproofing and Moisture Management
Wet gear fails, and moisture is the quiet killer of a good hunt. But "keep it dry" is only half the story. The real organizing question is where gear lives at each stage, in the tree, in the truck, and in the garage, because each stage has a different moisture problem and a different fix.
Three Storage Zones, Three Different Rules
Most guides treat storage as one thing. It isn't. Your gear moves through three zones, and organizing for one zone badly undermines the others.
- In-tree (tactical). Minutes matter. Gear must be reachable, silent, and protected from rain and snow while you're using it.
- Truck or staging (transitional). Hours matter. Gear needs to breathe, drain, and not marinate in its own condensation between the morning hunt and the evening sit.
- Garage or closet (logistical). Months matter. Gear needs to be fully dry, off the floor, and inventoried before it goes into off-season storage.
In-Tree: Weatherproofing While You Hunt
- Keep ropes in a breathable bag, not a sealed plastic one. Trapped moisture weakens rope over time, and a sealed bag turns a damp rope into a wet one.
- Use a waterproof shell for the pack itself. The Pack Rat uses 600D waterproof polyester, which shrugs off rain on the hike in.
- Route your gear strap so water runs off the tree side, not down into your pouches.
- Late-season tip: metal carabiners and platform hardware frost faster than anything else in your kit. Keep the ones you touch most, release, lineman's carabiner, platform buckle, in a fleece-lined pouch or an interior pocket so they stay above freezing and don't bite your bare hand.
Truck or Staging: The Zone Everyone Forgets
This is where most hunters lose gear to mildew and rust without realizing it. A tote left in a truck bed with wet ropes inside is a science experiment by the next morning.

- Never seal wet gear in a tote. Lay ropes, saddle, and soft goods flat on a rubber mat or hang them from a cargo hook so air moves around them.
- Keep a dedicated "wet bin", an open crate, not a lidded tote, for anything that came back damp. It drains and ventilates while you drive.
- Hard goods (platform, sticks, carabiners) can stay in a closed tote; soft goods should not share that space until they're dry.
Garage or Closet: Off-Season Organization
Off-season is when organization pays compound interest. A saddle left damp in a tote grows mildew and smells, which spooks deer the next fall, and worse, degraded rope is a safety issue, not just a scent one.
A workable off-season layout:
- Inspect first, store second. Check ropes for glazing and flat spots, and retire anything worn before it goes on the shelf.
- Hang ropes, don't coil them tight. A loose figure-eight on a peg keeps memory out of the rope and lets it dry fully.
- Store the saddle open, not compressed. Stuffing it into a stuff sack for six months sets creases that take a season to work out.
- Label totes by category, climbing, safety, accessories, scent control, so spring inventory takes minutes, not an afternoon.
- Keep gear off concrete. Concrete wicks moisture; a simple shelf or wall peg solves it.
A Quick Moisture Routine After Every Trip
- Empty every pouch. A forgotten snack wrapper or glove holds moisture against gear.
- Wipe metal hardware with a dry cloth before it goes in the truck bin.
- Hang ropes and saddle overnight in moving air, a garage fan beats a closed closet every time.
- Re-pack only when everything is dry to the touch, inside and out.
Frequently Asked Questions
What are the must-haves for saddle hunting gear?
At minimum you need a saddle and harness, lineman's rope, tether, climbing sticks or a one-sticking setup, a platform, and a gear hanger or bow hook. Add an accessory belt with molle pouches, a prusik or friction hitch, carabiners, and a pack that carries your platform and sticks. A rope caddy keeps your bridge and extra rope out of the way, and gear cinchers secure aiders so nothing slips during the climb.
What is the best bow hanger for saddle hunting?
Look for a hanger that mounts to your saddle belt or molle loops, holds the bow securely without swinging, and adds almost no weight. A simple hook or caddy that clips on and off quietly works well because it keeps your bow within reach without cluttering the tree. Test it with your actual bow weight before the season, and make sure the attachment point does not interfere with your bridge or tether.
How do I organize saddle hunting gear for mobile setups?
Start with a pack that carries your platform and sticks vertically to reduce hang-ups. Keep quick-access items like your rangefinder, release, and bow hanger on your belt or chest rig, and store ropes in dedicated caddies so they do not tangle. Weigh your full loadout, then move heavy items close to your back and balance the load left to right. A consistent layout means you can set up in the dark without searching.
How can 3D printed accessories improve saddle gear management?
3D printed accessories like platform caddies, rope caddies, and gear cinchers solve specific organization problems without adding bulk. A platform caddy carries your platform on your saddle while you climb, a rope caddy keeps your bridge and tether secured, and gear cinchers hold aiders exactly where you want them. Because they are printed in-house, they can be sized to your exact platform model and belt width.
Organizing saddle hunting gear is a system, not a one-time cleanup. The hunters who stay quiet and fast in the tree are the ones who built that system at home. At 3D Hunting Solutions, we make purpose-built accessories, designed and 3D printed in-house and field-tested by our founder, so your setup works as hard as you do. Shop the full lineup and build a loadout that keeps your gear exactly where you need it.